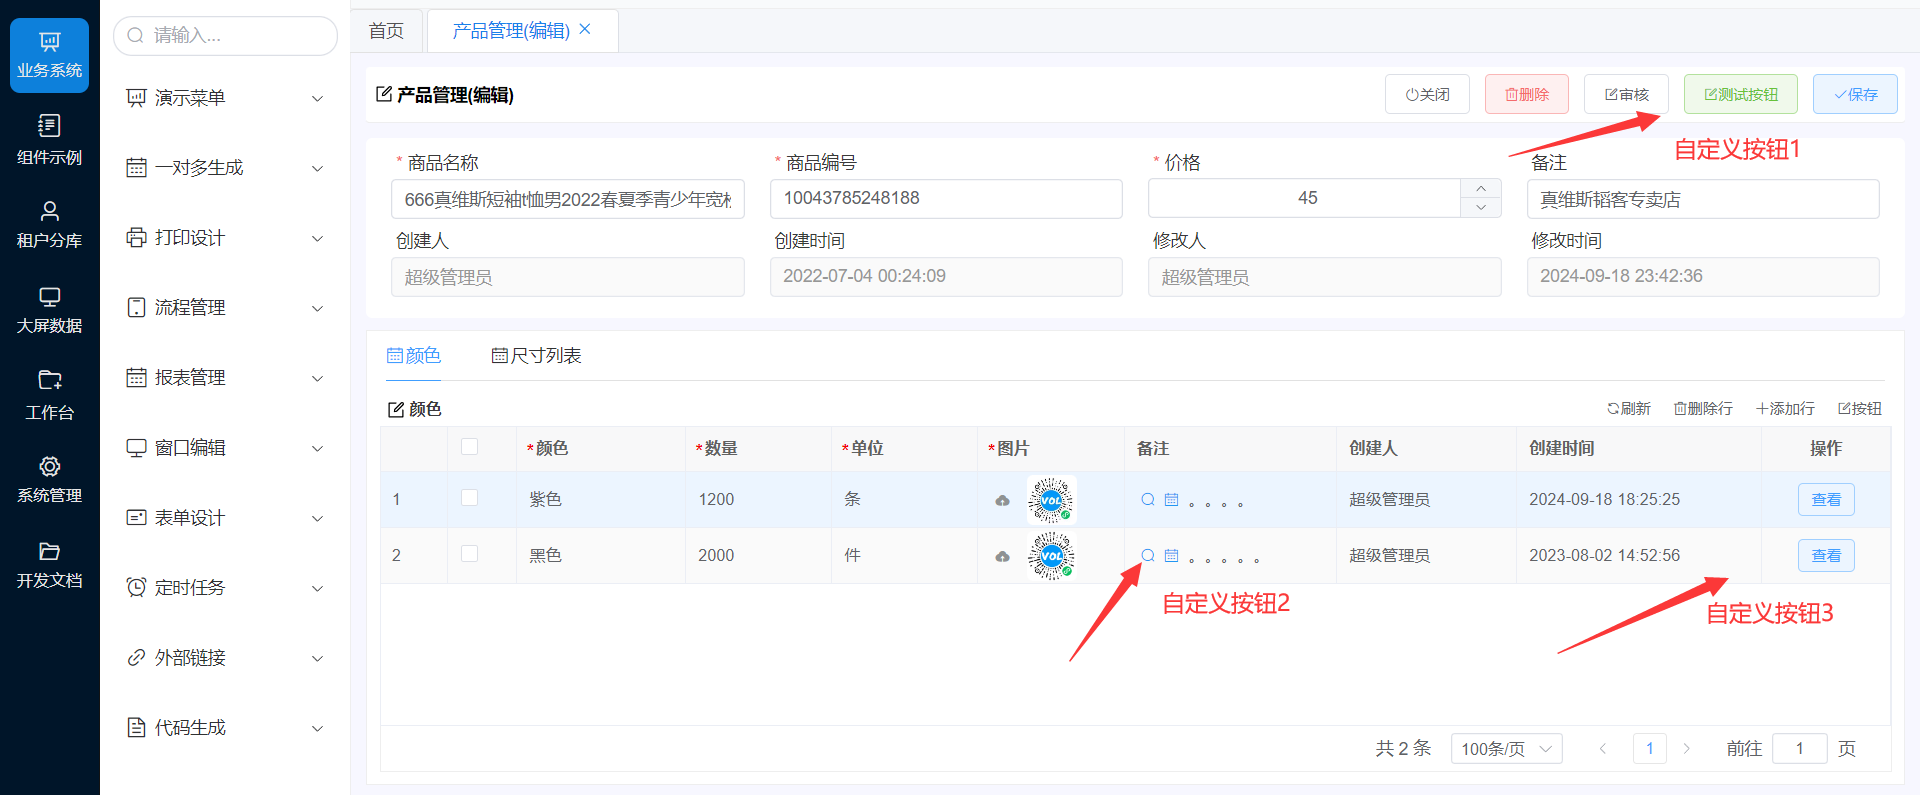
# 自定义按钮1
查看代码
<template>
// 在生成的edit.vue文件vol-edit标签添加@initButtons="initButtons"方法
  <vol-edit ref="edit" @initButtons="initButtons"></vol-edit>
</template>

<script setup lang="jsx">
    //初始化表单按钮
    const initButtons = (buttons) => {
        //splice在第三个按钮后面添加一个按钮,也可使用buttons.push或者unshift添加按钮到最后或最前
        buttons.splice(3, 0, ...[{
            name: '测试按钮', //按钮名称
            icon: 'el-icon-edit-outline', //按钮图标http://doc.volcore.xyz/icon/
            type: 'success', //type类型见:https://element-plus.org/zh-CN/component/button.html
            plain: true,
            onClick: () => {
            proxy.$message.success('点击了按钮')
            }
        }]) //数据可以传多个按钮配置
    }
</script>
1
2
3
4
5
6
7
8
9
10
11
12
13
14
15
16
17
18
19
20
2
3
4
5
6
7
8
9
10
11
12
13
14
15
16
17
18
19
20
# 自定义按钮2
查看代码
<template>
// 在生成的edit.vue文件vol-edit标签添加@detailButtons="detailButtons"三个方法
  <vol-edit ref="edit"
    @detailButtons="detailButtons"
    @initDetailColumns="initDetailColumns"
    @initSubDetailColumns="initSubDetailColumns"
  ></vol-edit>
</template>

<script setup lang="jsx">

//初始化主从表按钮(注意不是一对多,只是主从表,一对多的看下面)
const detailButtons = (detailButtons) => {
  // 配置同上(自定义按钮1),detailButtons.splice()
}

//初始化主从表按钮(注意不是一对多,只是主从表)
//  detail.columns.forEach((col) => {
//     if (col.field == 'Remark') {
//       col.edit = null
//       col.render = (h, { row, column, index }) => {
//         return (
//           <div>
//             <el-button link
//               onClick={($e) => {proxy.$message.success('点击了图标1') }}
//               class="el-icon-search"
//               style="color: #2196F3;cursor: pointer;"
//             ></el-button>
//             <el-button  link
//               onClick={($e) => {proxy.$message.success('点击了图标2') }}
//               class="el-icon-date"
//               style="margin-left:1px;color: #2196F3;cursor: pointer;"
//             ></el-button>
//             <span style="margin-left:5px">{row.Remark}</span>
//           </div>
//         )
//       }
//     }
//  })


//初始化一对多二级表格与按钮
const initDetailColumns = (detailColumns) => {
  detailColumns[0].buttons.push({
    name: '按钮', //按钮名称
    icon: 'el-icon-edit-outline', //按钮图标http://doc.volcore.xyz/icon/
    type: 'primary',
    plain: true,
    onClick: () => {
      proxy.$message.success('点击了二级明细按钮')
    }
  })

  //初始化表格按钮
  detailColumns[0].columns.forEach((col) => {
    if (col.field == 'Remark') {
      col.edit = null
      col.render = (h, { row, column, index }) => {
        return (
          <div>
            <el-button link
              onClick={($e) => {proxy.$message.success('点击了图标1') }}
              class="el-icon-search"
              style="color: #2196F3;cursor: pointer;"
            ></el-button>
            <el-button  link
              onClick={($e) => {proxy.$message.success('点击了图标2') }}
              class="el-icon-date"
              style="margin-left:1px;color: #2196F3;cursor: pointer;"
            ></el-button>
            <span style="margin-left:5px">{row.Remark}</span>
          </div>
        )
      }
    }
 })

//初始化一对多三级表格与按钮
const initSubDetailColumns = (subDetailColumns) => {
  //操作同上initDetailColumns
}

</script>
1
2
3
4
5
6
7
8
9
10
11
12
13
14
15
16
17
18
19
20
21
22
23
24
25
26
27
28
29
30
31
32
33
34
35
36
37
38
39
40
41
42
43
44
45
46
47
48
49
50
51
52
53
54
55
56
57
58
59
60
61
62
63
64
65
66
67
68
69
70
71
72
73
74
75
76
77
78
79
80
81
82
83
2
3
4
5
6
7
8
9
10
11
12
13
14
15
16
17
18
19
20
21
22
23
24
25
26
27
28
29
30
31
32
33
34
35
36
37
38
39
40
41
42
43
44
45
46
47
48
49
50
51
52
53
54
55
56
57
58
59
60
61
62
63
64
65
66
67
68
69
70
71
72
73
74
75
76
77
78
79
80
81
82
83
# 自定义按钮3
查看代码
<template>
// 在生成的edit.vue文件vol-edit标签添加@detailButtons="detailButtons"三个方法
  <vol-edit ref="edit"
    @initDetailColumns="initDetailColumns"
    @initSubDetailColumns="initSubDetailColumns"
  ></vol-edit>
</template>

<script setup lang="jsx">


//主从表添加按钮(注意不是一对多)
// detail.columns.push({title:"操作"})//其他配置同下


//初始化一对多二级表格与按钮
const initDetailColumns = (detailColumns) => {
  //明细表单独添加一列按钮,将示例:http://doc.volcore.xyz/web/%E8%87%AA%E5%AE%9A%E4%B9%89%E6%8C%89%E9%92%AE.html
    detailColumns[0].columns.push({
        title: '操作',
        field: '操作',
        width: 80,
        align: 'center', // 'center',
        render: (h, { row, column, index }) => {
            return (
                <div>
                    <el-button
                        onClick={($e) => { proxy.$message.success('点击了表格按钮') }}
                        type="primary"  plain
                        style="height:26px; padding: 10px !important;">
                       查看
                    </el-button>
                </div>
              )
            }
        })
    }
}
//初始化一对多三级表格与按钮
const initSubDetailColumns = (subDetailColumns) => {
  //操作同上initDetailColumns
}

</script>
1
2
3
4
5
6
7
8
9
10
11
12
13
14
15
16
17
18
19
20
21
22
23
24
25
26
27
28
29
30
31
32
33
34
35
36
37
38
39
40
41
42
43
44
2
3
4
5
6
7
8
9
10
11
12
13
14
15
16
17
18
19
20
21
22
23
24
25
26
27
28
29
30
31
32
33
34
35
36
37
38
39
40
41
42
43
44